Description
n8n-nodes-carbonejs
> [!TIP]
> If you’re interested in generating documents using N8N from a Word/Excel/Powerpoint template, you may also be
> interested in the n8n-nodes-docxtemplater node, which
> uses Docxtemplater as the rendering engine.
>
> Docxtemplater has a different syntax for filters/formatters and its node has more configurable options than this one.
> It allows you to write your own Transforms (the equivalent to
> Carbone’s Formatters) by using
> N8N’s tool-calling functionality, commonly used on LLMs.
> It also allows you to
> define custom data sources that are called
> while the document is rendering, as opposed to the standard JSON object that must be available before the document
> is even read. It also supports Docxtemplater Modules, which add functionality
> such as image rendering or more ways to generate tables, and can be bought from Docxtemplater or developed separately.
This is an n8n community node. It lets you use the Carbone JS library in your n8n workflows.
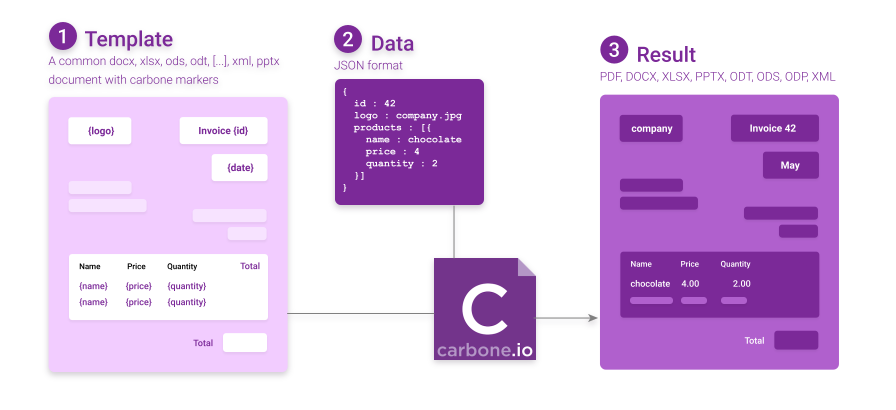
Carbone is a report generator that lets you render JSON data into DOCX, PDF, XLSX and more formats:
!a diagram of the dataflow in Carbone
n8n is a fair-code licensed workflow automation platform.
> NOTE: Carbone is licensed under
> the Carbone Community License (CCL), which says that ”
> Roughly speaking, as long as you are not offering Carbone Community Edition Software as a hosted
> Document-Generator-as-a-Service like Carbone Cloud, you can use all Community features for free.”. AFAICT, this means
> that this plugin must also be distributed under CCL, and that you can’t install it in a N8N instance and then use it
> to
> provide document generation as a service. You can use it for “your own internal business purposes” and “value-added
> products or services”, as long as they aren’t primarily document generation services.
Installation
Operations
Compatibility
Usage
Resources
Installation
Follow the installation guide in the n8n community
nodes documentation.
Operations
Render Document
Must receive an input item with both $json and $binary keys. The $json key may be used to compose the “context”,
which will be provided to the templating engine. The $binary key should contain a document that contains a valid
Carbone template.
This operation can take “advanced options”, which are passed directly to Carbone’s rendering engine.
See Carbone’s docs for information about each option. They appear in
the Options dropdown, at the bottom of the Render operation:
!a screenshot of the advanced options
Convert to PDF
> NOTE: This operation requires LibreOffice to be installed. If using the native NPM install, you should install
> LibreOffice system-wide. If using the Docker images, this operation doesn’t seem to work 🙁
This node must receive items with a binary property containing a supported document (DOCX, XLSX, PPTX, ODT, ODS, ODP, ODG, HTML, XML, TXT, or CSV). The selected document will be rendered
into a PDF file using the LibreOffice renderer,
since according to one of the Carbone authors, ”
I tried to avoid LibreOffice because I wanted a tool really light and highly performant. But after many researches, I
have never found a solution to convert a document more reliable than LibreOffice and which can run everywhere.”
Merge PDFs
This node takes two inputs, like
the Merge node. Unlike the merge node, both
inputs must have the same amount of elements. The node will output a stream with the same amount of items, where every
output item is the result of merging one element from Input 1 and one element from Input 2, by position (i.e., first
with first, second with second, and so on).
Compatibility
This plugin has been developed and tested on N8N version 0.228.2. It should work with older versions too, but it hasn’t
been tested.
Usage
Basic usage: render to a DOCX file
The Render node needs to receive data items with both JSON
and binary data. The binary data is the template, and
the JSON data will be the context passed to the template.
To generate these data items, you’ll probably want to use
a Merge Node, with Mode set to Combine
and Combination Mode set to Multiplex. This generates a cross-join of all data in Input A and Input B (i.e., every
possible combination of items). If you only input one item in the template, you’ll get one item out for each different
JSON context.
See below for an example:
The Merge node receives 3 items in its Input A, and 1 item in its input B. Every possible combination yields 3*1 = 3
output combinations, each with the same template but different JSON content.
The data items output by the node will also have JSON and binary data. The JSON data is the context that was used for
rendering the document (which is not necessarily the same as the node’s input $json key), and the binary data is
another DOCX document, rendered from the input Template.
Complicated usage: render, convert to PDF, then add a static “cover page”
The workflow above is a more complicated version of the workflow, which uses everything that this node provides:
1. The rendering part is the same as above: the JSON contexts are generated somehow, the template is read from disk and
replicated on every context, and then the Carbone node is used to render the documents
1. Every rendered document is converted to PDF
1. A “cover page” (a static PDF document) is read from disk and replicated on every PDF document (using the same Merge
pattern as in the Simple Example above)
1. The Merge PDF node is used to add the cover letter at the start of every PDF document
Here’s how the data looks at different points in the path (look for the yellow notes with letters):
A. The original template, which refers to a property in the context called a. Imagine that it’s, say, the name of a
user.
!a Word document containing a placeholder for the property “a”
B. The document after being rendered, here with the context {"a": 1}
!a Word document that says “Hello, 1”
C. The same document, converted to a PDF file
!a PDF document that says “Hello, 1”
D. The “cover page”
!a PDF document with a single page that says “Sample Report”
E. The document, now with the cover page added. Note that it has two pages, coming from two different documents
!a PDF document with two pages, the first one says “Sample Report” and the second one says “Hello, 1”
Resources
- n8n community nodes documentation
- General Carbone docs
- A short tutorial on template design
- Detailed docs on template design
- [ ] Ensure that the
/home/node/.n8ndirectory (on the container) is mapped to a volume. If using plain Docker, use - [ ] Install the node as normal (i.e. by going to the
Settings>Community Nodespage and searching for - [ ] ~~If you wish to use the Convert to PDF action, you’ll additionally need to add the LibreOffice system library to
Usage with Docker
> NOTE: As of now, I haven’t been able to make Carbone work with LibreOffice in Docker, so it probably won’t work
> with N8N Docker deployments. If you manage to make it work, please open an issue!
>
> As of now, if you need to convert rendered documents to PDF, I recommend either a) using native (NPM) deployments for
> N8N, o b) using a standalone Docker container that exposes some sort of REST API, deploying it alongside the N8N
> container, and using
> the HTTP Request node to interface
> with it.
>
> May I suggest Gotenberg, just for the awesome portrait of a Gutenberg
> gopher? Note that I can’t vouch for the security of that service, but it seems legit and active.
Using the node with a native N8N instance (i.e., one installed with
npm) is relatively easy: install LibreOffice using the OS’s utilities,
if required (e.g. apt install libreoffice-common on Ubuntu), then install the node with npm or using the N8N UI, and
then use it.
Docker deployments add some complexity, since you can’t necessarily
rely on the NPM packages persisting across container restarts, ~~and you need to install the LibreOffice package, if
required, in the container image, not on your host OS~~.
Here’s a checklist of changes that are required to make the node work on Docker deployments:
-v hostdirorvolname:/home/node/.n8n as part of the docker run command (note that
N8N’s Docker quickstart already does this, and maps
that folder to ~/.n8n on your host device). If using Docker Compose, ensure that you have an entry under the
volumes array that has - hostdirorvolname:/home/node/.n8n as its value
n8n-nodes-carbonejs). Ensure that the node appears in the host-mapped volume, under the node_modules directory.
the Docker image and recompile it.~~
– [ ] ~~Create a Dockerfile with the following contents:~~
“Dockerfile
FROM n8nio/n8n:latest
RUN apk --update --no-cache --purge add libreoffice-common
- [ ] ~~If using plain Docker, rundocker build . -t n8nio/n8n:latest-libreoffice~~ - [ ] ~~From there on, run N8N asdocker run <...> n8nio/n8n:latest-libreoffice~~ - [ ] ~~If using Docker Compose, change the service declaration:~~
yml
services:
n8n:
image: n8nio/n8n:latest-libreoffice # Declare a new tag
build: . # Add this line
- [ ] ~~From there on, rundocker-compose buildbefore runningdocker-compose up, or usedocker-compose up -b~~ - [ ] ~~Whenever you need to update the N8N version, remember to rundocker pull n8nio/n8n:latestfirst, as otherwise the build process will use a cached base image~~A workaround for converting documents to PDF on Docker
Since the LibreOffice-Carbone-N8N-Alpine stack is currently not working, I'd recommend using a standalone dedicated container to do document→PDF conversions, in the spirit of small, dedicated microservices and such.
A cursory Google search turns up Gotenberg, "A Docker-powered stateless API for PDF files." As usual, do your own research, deploying untrusted containers may make your lunch disappear, and all the usual warnings.
See their docs for Docker Compose information:
yml
services:
# Your other services (i.e. N8N)
gotenberg:
image: gotenberg/gotenberg:7
`
Then, use the LibreOffice module to convert files:
1. Create a HTTP Request node in the
N8N workflow
1. Set the method to POST
1. Set the URL to
1. Enable the toggleForm-Data
1. Set the Body Content Type to
1. Set the Parameter Type of the first Body parameter to
1. Set the Name to (it looks like it could also be something else, but set it to files just to match thedata
Gotenberg docs)
1. Set the Input Data Field Name to the name of the binary field holding the DOCX file (could be )
See below for a screenshot of a working configuration:

By default, this configuration will override the incoming file with the response's (PDF) file. If you wish to preserve
both files:
1. In the HTTP Request node, click the Add Option button at the bottom, then click the Response option
1. In the new section that appears, set the Response Format to File
1. In the new Put Output in Field textfield that appears, set it to a name that is different to the name of the input

file (e.g., if the input file is in , set it to data_pdf or something)

Development
More information here.
You must have a local (non-Docker) installation of N8N.
1. Clone this repo
1. npm i
1. Make changes as required

1.
1.
1. Go to N8N's install dir ( on Linux), then run npm link n8n-nodes-carbonejs
1. . If you need to start the N8N instance on another port, N8N_PORT=5679 n8n start
1. There's no need to visit the web UI to install the node: it's already installed since it lives in the correct

	 directory

1. After making changes in the code and rebuilding, you'll need to stop N8N (Ctrl+C) and restart it ()npm run dev
1. For faster changes, instead of rebuilding the code each time, run . This will start the TypeScript
compiler in watch mode, which will recompile the code on every change. You'll still need to restart N8N manually,
though.
Small-scale release for single person
Use when someone has reported an issue, to give that person a way to test the fix
without having to release a version that may not fix their issue. Especially useful
when the issue can't be reproduced locally.
1. Temporarily edit the package.json file to another version, e.g. v1.2.3-bugfix123
2. Run
3. This will build and upload a new release to NPM, without marking it as the latest release! This is important

	 because otherwise other users of the node will start getting prompts to update their installations, which isn't

	 correct

4. Tell the user that may be interested in testing the changes to force-install that new version

5. If/when the user confirms that the version fixes the issue, release for everyone: see below
Releasing changes
. We use SemVer.