Description
n8n-nodes-entity-enricher


An n8n community node that integrates with Entity Enricher — a multi-model LLM enrichment platform with schema-driven structured output, multilingual support, and automated fusion.
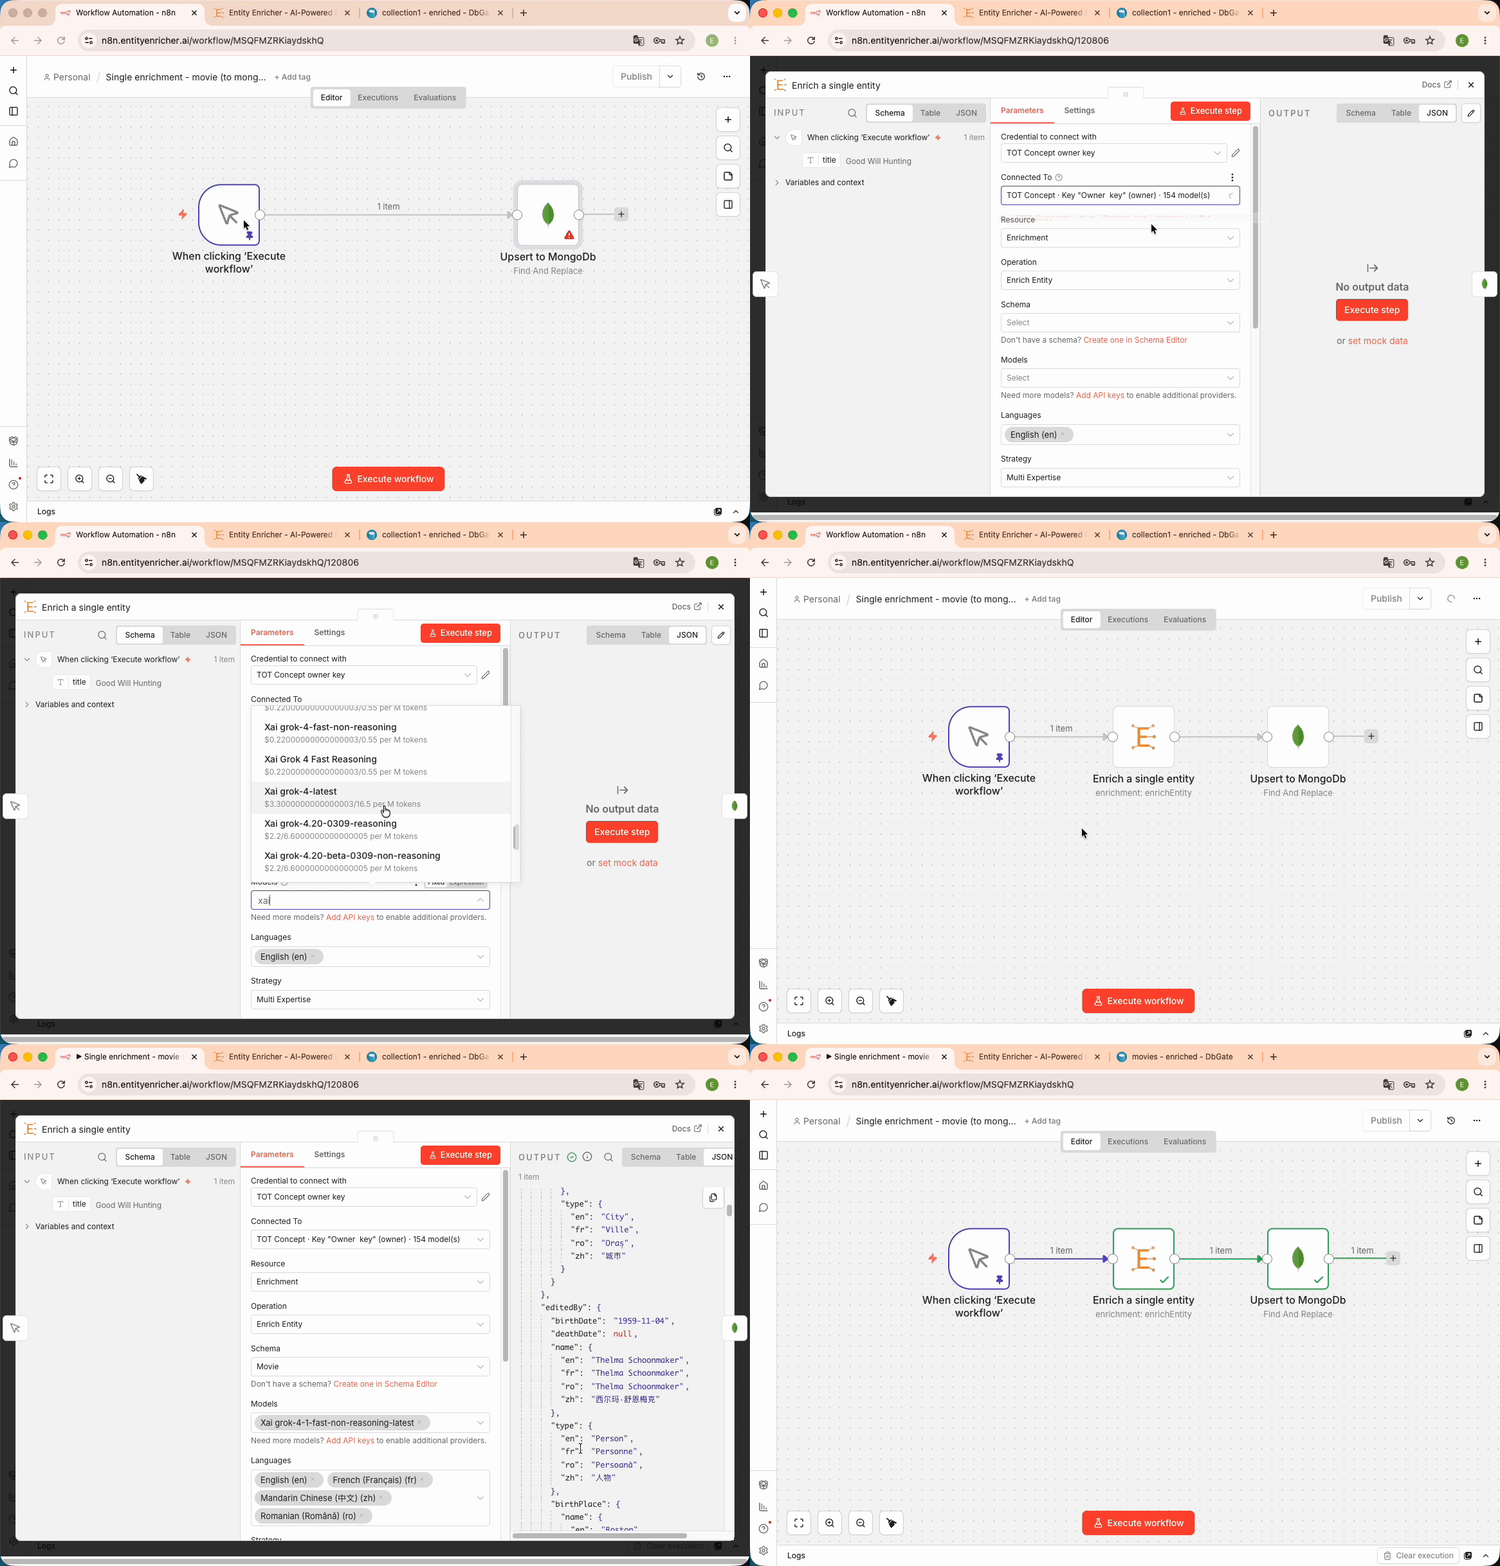
!Single entity enrichment workflow
The package ships two nodes covering the whole loop, not just the enrichment call:
- Entity Enricher — enrich one entity or a whole batch; author schemas from generated samples; attach documents and images; pull the SQL delta feed of a database sync.
- Entity Enricher Trigger — fire a workflow on completed enrichments, on enrichments the database refused, or when new database deltas are ready.
- A designed schema, not a JSON dump. Register a database on a schema and Entity Enricher derives the relational model from it: a table per entity type,
PRIMARY KEYs, realFOREIGN KEYs, child tables for the parts an entity owns, junction tables for entities it merely references (one row many parents point at, not a copy per parent), typed columns, and indexes on what a list screen actually filters and sorts on. An LLM classification pass proposes each column’s SQL contract at link time; you curate it in the Model tab. - Migrations you don’t write. Edit the schema and publish: the change is diffed against what each database has actually shipped and travels down the same feed as the data — additive DDL applied silently, riskier transforms (a re-key, a type change, a renamed column) held for your confirmation. No hand-written
ALTER, no drift between the schema and the database. - Synced by an open-source client you run.
ee-databaseis an MIT-licensed Go binary that lives next to your PostgreSQL, MySQL or SQLite. It connects outward over WSS — no inbound firewall hole — and your connection string never leaves the machine: Entity Enricher never holds a credential to your database. It bootstraps from a.sqlsnapshot, applies each leased batch transactionally, acknowledges it, and halts loudly on a failing delta rather than skipping it. Releases are Sigstore-signed and the installer verifies that signature against the publishing workflow’s identity before the binary is ever executable.
Enrichments become a real database — yours
The enrichment is the easy half. What you normally end up building yourself — the tables to hold the results, the DDL, the migration when the shape changes, and a loader that keeps it consistent — is what a database sync does for you:
  your schema ──┬──▶ relational model   tables, PK/FK, child + junction tables, indexes
                ├──▶ migrations         schema edits, diffed and shipped as DDL
                └──▶ rows               every enrichment, merged into current state
                             │
                             │  one ordered feed, leased and acknowledged
                             ▼
                    ee-database  ──  MIT-licensed, Sigstore-signed, outbound WSS only
                             │       (your DSN never leaves your machine)
                             ▼
              your PostgreSQL · MySQL · SQLite
n8n reaches the same feed without a CLI, and without polling: the Entity Enricher Trigger fires the moment new deltas exist and hands them over already leased, so a workflow can apply them with the native Postgres node and acknowledge — see Database Sync.
Ready-made workflows: see examples/ — six importable workflows, including PDF-in, photo-in, and the full schema → database-sync arc.
Installation
From the n8n UI
1. Go to Settings > Community Nodes
2. Click Install a community node
3. Enter n8n-nodes-entity-enricher
4. Click Install
From the command line
pnpm install n8n-nodes-entity-enricher
Prerequisites
1. An Entity Enricher instance (cloud or self-hosted)
2. A credential — either an API key (create one in API Keys > App Access Keys) or an OAuth2 connection (see below)
Credential Setup — API Key (recommended for service-to-service)
First get an API key from Entity Enricher (organization owner role required):
1. In Entity Enricher, go to API Keys → App Access Keys
2. Click Create Access Key, name it (e.g. n8n), and pick a role — operator is enough to run enrichments and read records, editor also manages schemas — and an expiration
3. Copy the generated ent_… key immediately — it is shown only once
Then create the credential in n8n:
1. Go to Credentials > New Credential
2. Search for Entity Enricher API
3. Enter your API key (format: ent_XXXXXXXXXXXX)
4. Set the Base URL (default: https://entityenricher.ai)
The credential is verified against the API on save. An organization access key acts independently of any user account, so workflows keep running even if the person who created the key changes role or leaves the organization.
Credential Setup — OAuth2
Connect with your Entity Enricher account instead of a static key. The connection acts on your behalf with your own role and is revocable anytime under Entity Enricher → API Keys → Connected Apps.
1. In n8n, go to Credentials > New Credential and search for Entity Enricher OAuth2 API
2. Copy the OAuth Redirect URL n8n displays on the credential
3. In Entity Enricher, go to Settings → API Keys → OAuth Clients (owner role required), create a client with that redirect URL, and copy its Client ID
4. Paste the Client ID into the n8n credential (set the Base URL if you self-host) and click Connect my account
The flow is OAuth 2.1 authorization code + PKCE with rotating refresh tokens. On the node, pick the credential type with the Authentication parameter (API Key / OAuth2).
Operations
| Category | Operation | Description |
|———-|———–|————-|
| Enrichment | Enrich Entity | Enrich a single entity — just pick a schema; the best model and strategy are chosen automatically |
| Enrichment | Enrich Entity Advanced | Enrich a single entity with full control: models, fusion, strategy, classification, structured output |
| Enrichment | Batch Enrich | Enrich all input items as a single batch — automatic model and strategy |
| Enrichment | Batch Enrich Advanced | Enrich all input items as a single batch with the full parameter set |
| Schema | List Schemas | List available saved schemas |
| Schema | Get Schema Details | Get full schema content with extracted search key properties |
| Schema | Generate Sample | Generate 1..N realistic sample objects of one entity type — the entry point of schema authoring |
| Schema | Generate Schema | Generate and auto-save a JSON schema from the input items — every item is one sample of the same entity type |
| Record | List Records | Query enrichment records with pagination and filters |
| Record | Get Record | Retrieve a specific enrichment result by ID |
| Record | Sync Records to Database | Send a stored (or transformed) enrichment output to its schema’s database sync — re-validated against the published contract, then the admission gate |
| Fusion | Merge Results | Merge multiple model results with optional LLM arbitration |
| Attachment | Add Attachment | Upload one or more binary properties from the input item (single multipart request) and return one item per attachment ID |
| Attachment | Delete Attachment | Delete an attachment by ID — a handy post-enrichment cleanup step |
| Database Sync | List Database Syncs | List the database syncs registered on a schema, with pending delta counts |
| Database Sync | Fetch Deltas | Fetch the next FIFO window of SQL deltas, optionally leasing them |
| Database Sync | Acknowledge Deltas | Acknowledge applied deltas up to an ID (releases the lease; may purge per sync options) |
| Configuration | Get Options | Get available models, languages, and strategies |
The node is also exposed as an AI Agent tool (usableAsTool), so an agent can call any of these operations directly.
Single Entity Enrichment
Enrich a single entity against a schema with one or more LLM models.
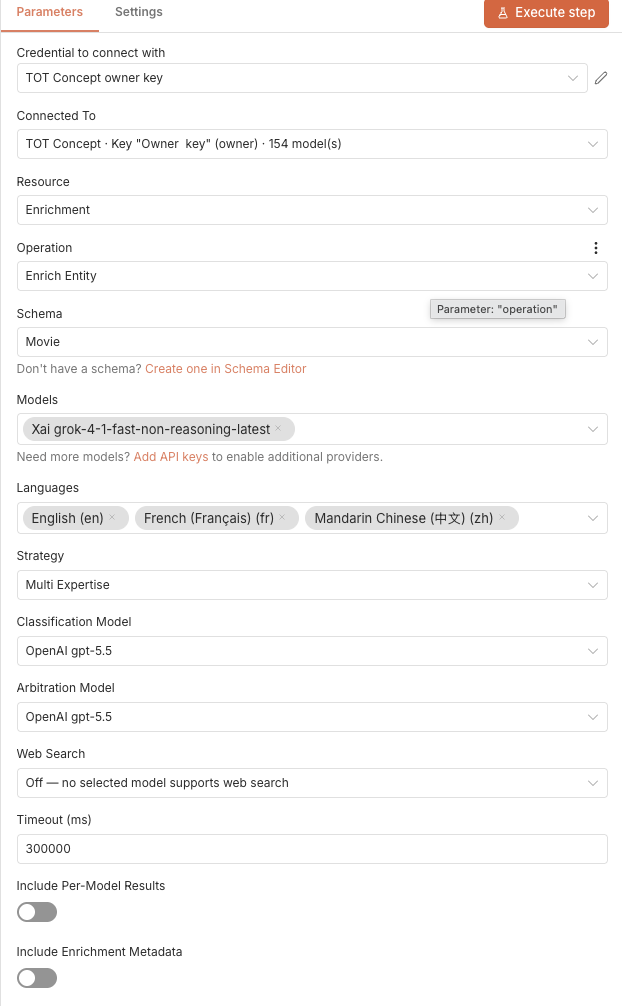
Configuration:
!Node configuration for single enrichment
Simple and advanced operations
Enrich Entity and Batch Enrich (the defaults) show only the essentials:
With these operations, Entity Enricher automatically runs with your organization’s best model (the pinned per-task default, else the top benchmark-scored model — manage it in Settings → Organization Defaults) and the auto strategy, and outputs clean enriched data without metadata. If your organization has neither a pinned default nor a scoring benchmark, the node fails with instructions — pin a default or use an Advanced operation.
Enrich Entity Advanced and Batch Enrich Advanced expose the full parameter set described below. Workflows created before this split keep the full parameter set and their exact behavior.
Advanced parameters
auto (default — the server picks from your schema’s shape), singlepass, expertdomains, or multi_expertise (parallel calls per domain)Output (default):
By default, the output contains only the enriched data at the top level for direct field access:
{
  "company_name": "Pfizer",
  "headquarters": "New York",
  "revenue_usd": 58496000000,
  "..."
}
Toggle Include Enrichment Metadata to add cost, tokens, fusion details, and record IDs:
{
  "result": { "company_name": "Pfizer", "headquarters": "New York", "..." : "..." },
  "record_id": "uuid",
  "success": true,
  "is_fused": true,
  "cost_usd": 0.0042,
  "input_tokens": 1250,
  "output_tokens": 890,
  "fusion": { "agreedfields": 18, "conflictedfields": 2, "total_fields": 20 },
  "source_models": ["anthropic::claude-sonnet-4-5", "openai::gpt-4o"]
}
Toggle Include Per-Model Results to also output individual model results alongside the fused output. When a model produces nothing, its entry carries a typed errorcode — modelretired (the provider retired it; it is auto-deactivated, reselect and retry), ratelimited, contextlengthexceeded, or providertimeout.
Example workflow: 01-enrich-single-entity.json.
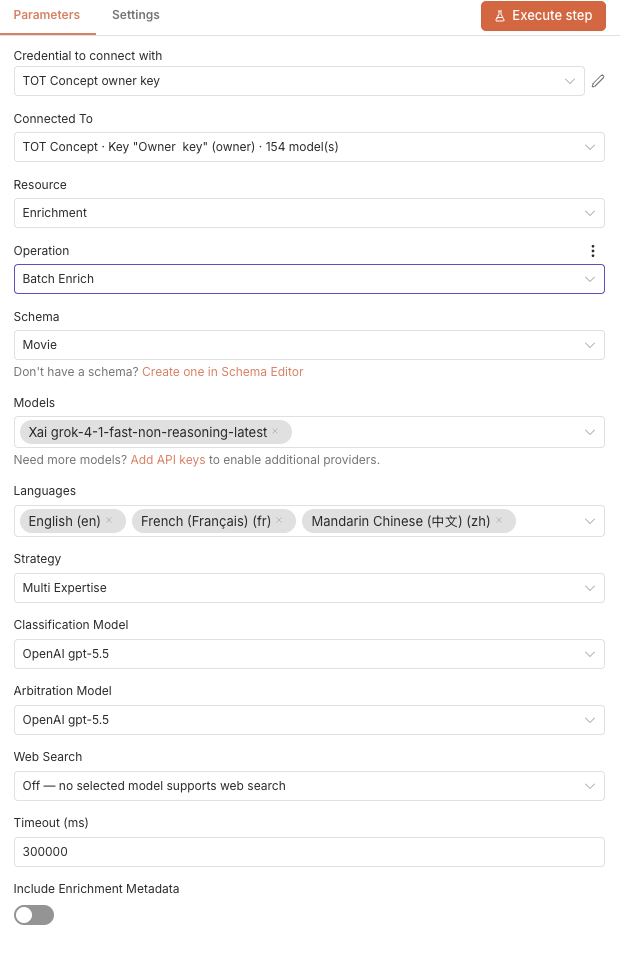
Batch Enrichment
Enrich all input items in a single batch with parallel execution and per-provider rate limiting.
Each input item is treated as one entity. The node outputs one item per entity with the enrichment result, making it easy to chain with database upserts or further processing.
!Batch enrichment configuration
Example workflow: 02-batch-enrich.json.
Document Attachments
Feed source documents (PDF, image, audio, office/text) into an enrichment so the models extract facts from your files instead of relying only on their training data.
Inline upload (recommended): toggle Upload Input Binary Files on Enrich Entity or Batch Enrich. The node uploads the input item’s binary files as attachments (one multipart request), feeds their IDs into the enrichment, and — with Delete Uploaded Attachments After Enrichment (default: on) — cleans them up afterwards, even when the enrichment fails. No separate Add Attachment / Delete Attachment steps needed:
HTTP Request (file) ──▶ Edit Fields (entity JSON) ──▶ Enrich Entity
uploadedattachmentids and whether they were deletedEach file reaches the model one of two ways, decided server-side by its format: extracted text inlined into the prompt (works with any model), or the original bytes (needs a model with the matching capability — with no model pinned, auto-selection restricts itself to models that qualify, and fails with a clear error when none does).
Pre-uploaded attachments: use the standalone Add Attachment operation when you want to upload once and enrich many entities against the same document(s), then reference the returned IDs in the Attachment IDs field (comma-separated). These are never auto-deleted — pair with Delete Attachment for cleanup. Both sources can be combined in one enrichment.
Example workflow: 03-document-to-enrichment.json.
Schema Authoring
Generate Sample invents realistic sample objects from a free-text request; Generate Schema turns samples into a saved, reusable schema. Together they replace the hand-written JSON that used to be a prerequisite for the first enrichment.
Generate Sample (Sample Count = 3) ──▶ Code (unwrap) ──▶ Generate Schema ──▶ Enrich Entity
Sample Count = 3 returns three distinct instances of the same type in one job: the first defines the fields and names the remaining instances, the rest fill those fields for their own instance. The schema then covers the union — a field missing or null in any sample becomes nullable instead of required, and the distinct observed values become the property examples. Mixed entity types fail with a clear error before any LLM call (tune with Commonality Threshold).attachment_coherence verdict, so a set mixing two different objects is caught before it becomes a schema.identifying property generation picked, which drifts between runs and mints duplicate rows. Requires an organization embedding model.Chaining the two operations needs an unwrap step. Generate Sample emits { success, sample: {…}, sample_index, … } per sample, while Generate Schema treats every input item as one sample object. Put a Code node between them:
return $input.all().map((item) => ({ json: item.json.sample }));
Example workflows: 05-samples-to-schema.json and 04-image-to-sample-to-schema.json (photo → sample → schema).
Database Sync
Register a database sync on a schema (in the app, or over MCP / the REST API) and every enrichment queues SQL deltas for it — the designed tables, their migrations, and the rows, in one ordered feed (what that gives you). The node drains it into your own PostgreSQL, MySQL or SQLite:
| Operation | Role |
|—|—|
| List Database Syncs | The databases registered on a schema, with their pending delta counts and linked schemas |
| Fetch Deltas | The next FIFO window, one item per delta (id, sql, kind, op, entity_type, revision). Claim leases the window; disable it for a replayable read |
| Acknowledge Deltas | Releases the lease up to a delta id, and purges delivered rows per the sync’s options |
Two rules decide whether the replica stays correct:
1. One window = one transaction. All deltas of one enrichment share a batch, and the projected tables carry DEFERRABLE INITIALLY DEFERRED foreign keys — splitting a batch across transactions fails on the constraint. A fetched window never splits a batch, so join the window’s sql and run it as one statement (PostgreSQL treats a multi-statement query as a single implicit transaction).
2. Acknowledge after the apply, never before. An ack on an apply that then failed loses those deltas permanently.
Deltas of kind: "schema" are DDL migrations and arrive before the data rows that need them — apply them in order, never filter them out.
> For a database the CLI can reach, ee-database is the better client: it bootstraps from the .sql snapshot, applies batches over a WebSocket and acks them. Use n8n when a CLI can’t run where the database lives, or to route deltas into something other than a database.
Example workflow: 06-delta-sync-to-postgres.json.
Entity Enricher Trigger
A webhook trigger — no polling — with three events:
| Event | Fires on | Emits |
|—|—|—|
| Enrichment Result | Every completed enrichment of a schema | One item per enrichment |
| Rejected for Database Save | Enrichments the database sync’s admission gate refused (required fields empty) | One item per rejection, with the missing fields — a ready-made review queue |
| Database Deltas Available | New SQL deltas are ready for a database sync | With Fetch Deltas on Fire (default), it fetches and leases the next window and emits one item per delta; disable to receive only the notification |
The trigger registers itself automatically when the workflow is activated, and deregisters when it is deactivated. Delta webhooks are registered per linked schema, not per database: a database aggregating several schemas has one endpoint each, so each drives its own workflow. With a single linked schema there is nothing to disambiguate; a multi-schema database asks you to pick one in Schema (Multi-Schema Databases).
Key Features
usableAsTool, so an agent can enrich entities, author schemas, or drain a delta feed on its ownWorkflow Ideas
| Pattern | Description |
|———|————-|
| CRM Enrichment | Webhook trigger > Extract company > Enrich > Upsert to CRM |
| Spreadsheet Pipeline | Read CSV/Google Sheet > Batch Enrich > Write enriched data back |
| Inbox to Structured Data | Email/Drive attachment > Enrich Entity with Upload Input Binary Files > Database |
| Photo Intake | Webhook with a photo > Generate Sample + Generate Schema the first time, Enrich Entity every time after |
| Waterfall Enrichment | Enrich with cheap model > Check quality > Re-enrich failures with premium model |
| Replica Keeper | Delta trigger > aggregate the window > apply in one transaction > Acknowledge Deltas |
| Rejection Review Queue | Rejected for Database Save trigger > post the missing fields to Slack/Linear for a schema fix |
| Scheduled Refresh | Cron trigger > Fetch stale records > Batch re-enrich > Update database |
| Webhook-Driven | HTTP webhook > Validate input > Enrich > Return result in response |
Documentation
Development
Install dependencies
pnpm installBuild
npm run buildLint (type check)
npm run lint
Releasing a New Version
Publishing is automated via GitHub Actions. To release a new version:
git tag n8n-v1.2.0 && git push origin n8n-v1.2.0
This triggers the CI/CD pipeline which will:
1. Build & lint the connector
2. Run integration tests (module loading + n8n startup verification)
3. Publish to npm with the version extracted from the tag
4. Create a GitHub Release with an auto-generated changelog from commits touching the connector directory
The tag name must follow the n8n-v format (e.g., n8n-v1.0.0, n8n-v1.2.3). The version in package.json is updated automatically during publish — no need to change it manually.
Changelog
See CHANGELOG.md for a full list of changes in each version.